Optimizing Shaders in Unreal Engine

  1. Prelude
    1. About this Article
  2. Material Editor
    1. Generated Shader Code
    2. Material Instances
  3. Optimizing Shaders
    1. Instruction Counts
    2. Static Parameters
      1. Usage Flags
    3. GPU Cycles
      1. Examples
      2. Distance Squared
    4. Constant Optimization
      1. Example – Pow
      2. Optimized broken by Varyings
      3. Taking Advantage of This
    5. Sampling Textures – Optimising for Pre-Fetches (Vertex Interpolators) (Older Hardware)
      1. Relying on Another Texture Fetch
      2. Vertex Interpolator & Custom UVs
    6. Conclusion

Prelude

I saw some recent advice shared around about optimizing shaders, which was well-intended, but not correct. I want to clear up some myths around optimising shaders in this article – specifically around the material editor inside Unreal Engine.

*Though this information technically applies to Niagara in some aspects as well as because Niagara produces compute shaders.

About this Article

I’m no expert and this information I’ve picked up over the years, which I’ve purposely simplified to be more accessible including the use of semantic terminology – some information is missing and it’s a complex topic. I openly invite everyone to add to the discussion in a friendly manner.

Material Editor

First we must understand what the Material Editor actually is.. which quite simply is a tool which is generating multiple shaders with the help of a node graph and some metadata (blend modes etc), all stored in a neat little asset – a material.

Each atomic (green) node in the graph instructs the compiler what code (HLSL in this case) to generate, and at the end we will have several HLSL shaders (depending on usage flags and domain types, but usually we will have several vertex shaders and pixel shaders for one material.

Generated Shader Code

The intermediate HLSL code which is generated can be viewed from Window > Shader Code > HLSL Code. From here we can also see the platform-specific code which is generated – this can be HLSL or even transpiled to GLSL (Android, for example).

You will notice a lot of templated code (this comes from MaterialTemplate.usf) – don’t be alarmed as the compiler will remove anything we don’t need at the end.

Material Instances

Material Instances are a concept which combines the traditional concept of materials (i.e. a package which contains all the parameters for a given set of shaders, just like Unity’s definition), and class inheritance. It’s an interesting concept and all this basically means is we can have a parent-child hiearchy of material instances which can inherit from each-other.

These waters get muddied however once we consider that the shaders which material instances use can be overriden using material property overrides (i.e. blend mode, two-sided overrides etc), material layers, and static parameters.

We won’t even touch on Landscape materials as this is a whole other rabbit hole..

Optimizing Shaders

Instruction Counts

Instruction counts basically tell us two things..

  • Size in memory (and on disk) of the shader(s) – more instructions, more memory our shaders will consume
  • Potentially a very high level view of how slow our shader is.. except also not quite (keep reading)

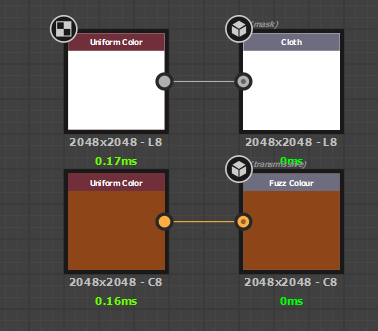
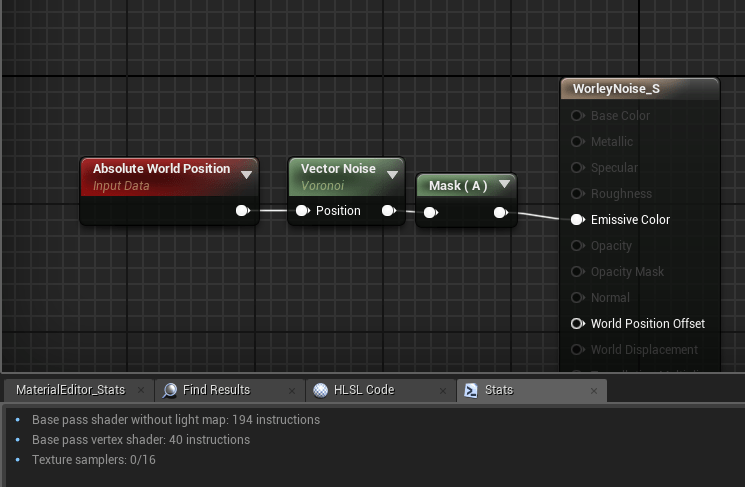
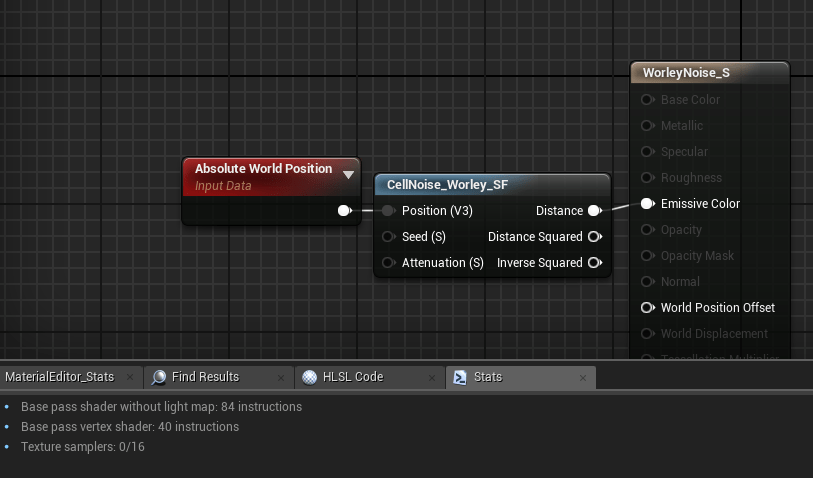
Unreal provides you with some stats around how many instructions your material generates with its Stats tab – this information is a useful first look at what your material is generating.

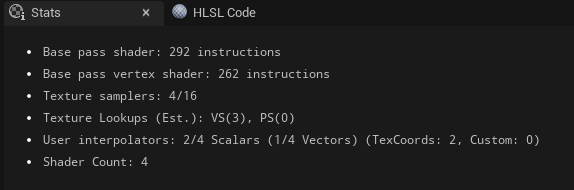
The problem arrives from something we just brought up earlier.. this is as estimate based on the intermediate HLSL code that is generated! So this is often inaccurate and only gives us a very high level view. To fix this problem we can use the Platform Stats tool inside the Material Editor to view the real instruction counts (and other stats) for the shaders generated for those platforms. This works because it will use the compilers linked for those platforms.
This view is incredibly useful as it will also tell us a bit more about the shaders generated for different usage flags, i.e. your vertex shader for a skeletal mesh is going to be a lot heavier than a static mesh!

Static Parameters

Before we talk about that, let’s talk static parameters! These are what they are referred to inside the engine code, but essentially we’re referring to..

  • Base property overrides (blend mode, shading model, two-sided etc.)
  • Material layers
  • Static switches and static channel mask parameters (but not regular channel parameters – those are just dot products)
  • Landscape layers – each landscape proxy will produce new permutations based on which layers are painted and in which order (as far as I know these are not shared across proxies, unless this has changed in recent versions)

These are properties which can be changed inside material instances and will dirty the permutation, causing new shaders to be generated for this material.
This obviously will produce entire copies of our shaders to accomodate for those properties/resources introduced at compile-time, causing more shader memory to be consumed by more instructions.

In older versions just using the static parameter overrides would cause this to be dirtied, but this seems to be resolved in recent versions.

Usage Flags

Usage flag further this problem (all the checkboxes in your material which determines what primitive types the material can be rendered with). This is because each static parameter will produce new shaders for each usage flag (though some shaders are thankfully shared).

Avoiding this issue is actually quite simple – disable Automatically Set Usage in Editor; this disables the functionality of automatically ticking flags in materials as the material is applied to those primitive types at editor-time, leaving it up to the author to explicitly define what the material is used with.

GPU Cycles

It’s probably common knowledge that the number of instructions plays a part in the performance of our materials, right? The more instructions you need to execute, the slower the shader is to execute.. right? Well actually not quite..

Not every instruction produces is 1:1 in the assembly it generates, nor is every instruction executed at the same speed (the number of cycles on the GPU).

Unfortunately this is not something Unreal shows you, and can be a bit compiler-dependent. But with some experimentation, knowledge of HLSL, some math knowledge, and some understanding of what is going on, you can figure out the general output of instructions & their cycles.

I highly recommend shader-playground.timjones.io for viewing the assembly and GPU cycles of your instructions. I use the Radeon GPU Analyzer for my work.

Examples

Based on the Radeon compiler, here’s what I’ve found for some common instructions..

InstructionAssemblyCyclesNotes
* (operator)mul4
+ (operator)add4
– (operator)Seems to be free to flip a value to negative
/ (operator)mul, rcp20Compiled to multiply by reciprocal (16 cycles)
powexp16If constants are used this will vary into a string of muls
sqrtsqrt16
sinsin16
coscos16
tansin, mul, rcp, cos52Compiled to use identity of tan = sin/cos, where the divide is a mul rcp like a regular divide, making this one of the most expensive instructions!

Distance Squared

Knowing this we can determine that finding the distance between two points on the can be a fairly expensive operation – because the distance is just the length of the delta vector!
AB == B – A, so distance(A, B) == length(AB)!

Getting the length of a vector is determined by sqrt(x^2 + y^2 + z^2) (scaling to whatever dimension you’re using, we’re assuming float3).

Fun Fact

Those familiar with pythagorean theorem will see something very fimiliar here, because this is in-fact, the exact same as c = sqrt(a^2 + b^2), where a and b are the lengths of the two orthonormal edges, which we can also visualize as our point or vector on the triangle.

With this knowledge we can see just getting the distance/length costs us ~28 cycles!

length(A)sqrt(x^2 + y^2 + z^2)sqrt, mul, mac, mac28 cycles

I bring this up because we can optimize this by using distance squared where possible instead – i.e. for comparing distance values we can just use distance squared! (just square your comparison value if it’s a regular distance value)
If we’re building a (signed) distance field or doing this in a loop then we can do this using distance squared too, and then sqrt the result, so we only need to sqrt once!

How do I get Distance Squared? Answer: Dot Product

Obtaining the distance squared can be done with the dot product, i.e. dot(x, x) – this is just a very easy way of returning the distance squared.

You may also see this used a lot in C++ code to optimize opterations, so it’s not exclusive to the GPU!

Constant Optimization

In short, the compiler will evaluate constants and operations involving constants (where it can) at compile time, which provides us with some very useful optimizations..

Here’s some example expressions and what they’ll be simplified to by the compiler..

ExpressionCompiled To
(x + 0) * 1x
sin(0)0 (radians)

Generally I recommend not trying to beat the compiler and re-valuating expressions yourself (I used to try and do this), i.e. replacing divides with multiply rcp – because you should just let the compiler decide and do the hard work! 😉
It also keeps your code/node graph readable and easier to understand.

Custom Node

I’ve seen a note about how this doesn’t work inside custom nodes, but this is actually untrue because the optimzation occurs when the assembly is produced and thus won’t necessarily be reflected by the stats tab in Unreal.

Example – Pow

An example which sparked me to write this article is the use of the pow instruction.
When using a constant exponent the compiler will optimize this into a string of multiply instructions if this is less cycles than the exp instruction which it would otherwise generate!

What this means is you can use the pow node with a constant exponent and this will determine how expensive it is (maxing at 16 cycles for an exp instruction).

For example these two expressions are equal because the exponent of 2 is constant.
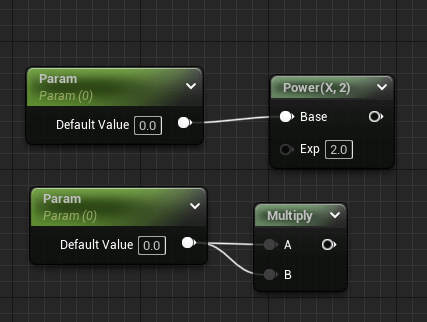
ExpressionCompiled toCyclesNotes
pow(x, 2)mul4
pow(x, 5)mul, mul, mul12
pow(x, 16)exp16Seems to hit the limit where exp is used
pow(x, 0.5)sqrt16Reciprocal values (1/x) as exponents will produce the root

Optimized broken by Varyings

This won’t work if the expression cannot be evaluated at compile time (this may require some math knowledge) – so varyings (parameters, texture samples, resources etc) will not be able to be evaluated and thus be as optimized. i.e. a varying used as a pow exponent won’t be optimized, but as the base arg it will be because x^3 can be evaluated to x*x*x.

Taking Advantage of This

With an understading of math and the compiler, we can take advantage of this optimization in our workflow – especially if we are using a material function-heavy workflow (which I recommend).

For example we can write a generic UV manipulation function, which by default has some input values which we know will get optimized out. You want to add functionality? Just input a parameter! No need for passing switches around!

We can apply this everywhere! As long as these inputs are not varying and use values which we know the math operations will cancel out, we can do this! Just make sure you do check the generated code.

Sampling Textures – Optimising for Pre-Fetches (Vertex Interpolators) (Older Hardware)

Important Note from the Author

I written this section originally with the prelude that this would be a divisive topic as the impact would vary on different hardware. Epic’s own docs mention this is specific to mobile optimization – this is because the impact is greater on ES2.0 from my reading on this topic.
Since then I have rewritten this section to provide more accurate reasoning with my updated understanding of the topic, but it none-the-less still a complex topic where the impact could still be variable.

On older hardware the GPU will perform and optimization to sampling textures (ES2.0) which is to pre-fetch them before the pixel (fragment) shader begins – this is called a pre-fetch.
*This is stated to generally have next to no performance penalty on modern hardware

This optimization is broken when the texture fetch becomes a dependent texture fetch, where the sampling of the texture relies on some math to be executed before the sample can begin, thus the GPU is unable to perform the pre-fetch.
This can happen under a variety of situations..

  • Modifying the UVs used to sample the texture in any form (even a swizzle will cause a dependant texture read)
  • Branching the texture sample with some conditionals
  • Sampling a texture relying on the result of another texture sample

This is explained by Apple’s own documentation here.

Relying on Another Texture Fetch

Dependent texture fetches are often confused with another situation (which is still very much a dependant texture fetch) which is sampling a texture using the result of another texture sample (i.e. using a noise texture to distort the UVs of another texture).
Make no mistake though, this is still a dependent texture fetch, but it is not the sole definition.

I have heard this specific situation can still incur a performance penalty on more modern hardware, but I don’t have anything concrete about this right now.

Vertex Interpolator & Custom UVs

To avoid dependent texture fetches under the most common circumstance, which is modifying the UV, we can pre-calculate the UV in the vertex shader and pass the new UVs to the pixel shader. Internally this utilises the TEXCOORD register, though on different hardware there are different limits on how many we have available. Unreal refers to these as user interpolators.

To do this we can utilise a feature called Custom UVs, or the more recent Vertex Interpolator (introduced a few years ago to automate the annoyance of managing Custom UVs). Vertex Interpolator is generally preferred as this will pack floats together instead of you having to manually manage a Custom UV.

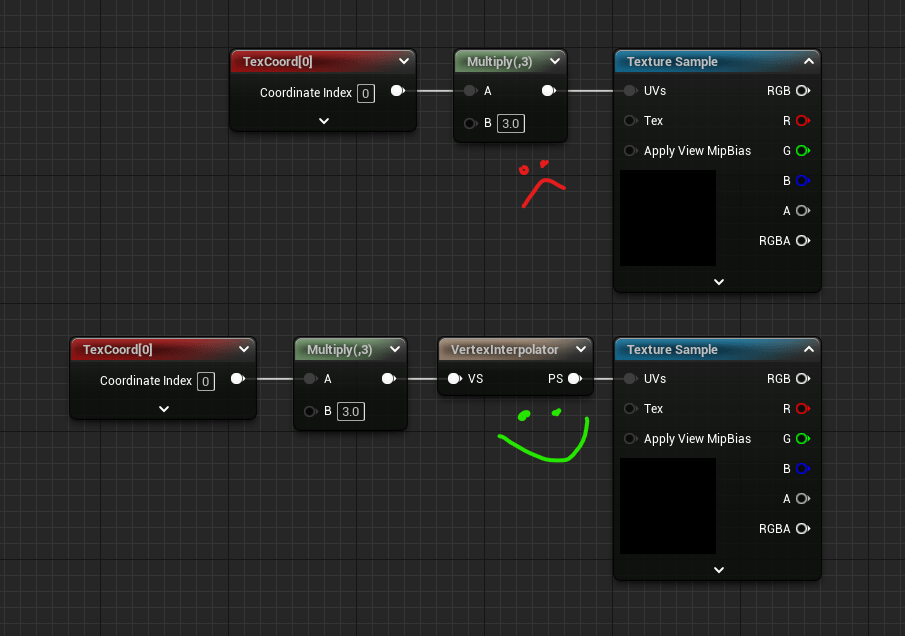
Each time you do this it will add to the User Interpolators stat (though this can be confusing to look at).
You should note that also using custom UV channels such as TexCoord1 will add new interpolators, and you only have a limited number of interpolators depending on the platform (usually 16)!

As you may have guessed, this will limit some per-pixel manipulation techniques such as PoM, distortion, parallax mapping etc. which can leave these deceivingly more expensive (scaling on different hardware).

Conclusion

There is a lot of things to consider when optimizing shaders, especially when using the Material Editor inside Unreal..

  • As always different hardware will require different optimizations – it shouldn’t need to be said but always check for yourself
  • Instruction counts are generally less important than the actual operations being executed (which we can see in the assembly), though it is still a nice high level view of our shader memory usage
  • GPU cycles are the true(r) measure of performance – knowledge of math for revaluating expressions and knowledge of the compiler are invaluable here, i.e. divide becomes mul rcp (20 cycles, vs just 4 cycles for a mul). Recommend using https://shader-playground.timjones.io/
  • Distance squared is some voodoo magic for optimizing our operations on the CPU and GPU
  • Manipulating UVs for texture samples in the pixel shader can stall the GPU, but can be resolved with clever use of vertex interpolators/custom UVs
  • Branching can stall the GPU (though we haven’t covered this in detail)
  • Usage flags should be limited in order to limit the shaders used because we can’t compile out the ones we don’t need
  • Static parameters (switches, material layers, base property overrides, landscape layers) can all cause permutation bloat and thus an increase in instruction counts & thus shader memory
  • Constants are optimized at compile-time vs varyings (textures, parameters etc.) so we should generally opt to use these unless there is an actual good reason to expose something as a parameter. Material functions become a lot more powerful workflow-wise once you understand how to manipulate this.

And that’s all for now! I may write more in the future, such as about branching (and its limitations on sampling textures), and using ddx/ddy/fwidth etc.

There’s still much more to the puzzle such as shader occupancy, but hopefully this dispells a lot of confusion and brings to light a lot of niche information which isn’t easily available in one place to non-graphics programmers.

Featured

Unreal Engine – Cloth Solver

I spent the weekend writing a cloth solver for Unreal Engine 4 after being inspired by the cloth placement tool I saw for Source 2’s Hammer editor.

The tweet which inspired me!

Currently it runs on the CPU & will generate its own primitive scene proxy to calculate the mesh on the render thread from the particle simulation.
It also collides with the scene in real time – works a lot better than I was expecting!

I am contemplating releasing this as a plugin for the marketplace, until then here are my plans:

  • Improve stability (ensure assert conditions won’t be hit as much as possible)
  • Double-check performance & provide CPU profiling stats akin to the CableComponent plugin
  • Move solver to GPU with a compute shader
  • Optional GPU scene depth collision

Cloth BRDF for Substance Designer (Updated)

I recently integrated Epic’s cloth shading model (inverse GGX and Ashkimin) into the Substance Designer shader I written a few months ago.
You can grab it here – github.com/Calvinatorr/SubstanceShaderUE

I integrated the logic of the inputs to parallel Epic’s for parity (i.e. Fuzz Colour = F0 when Metallic=1).

Vanilla shader vs Modified shader (Substance Designer viewport)
Render from Unreal Engine 4.25 (no post) for comparison
(lighting setup is different)

Inputs

What each input does:

  • Base Colour (Albedo) – Determines the diffuse colour. Metal=1 will blend the albedo to black
  • Roughness – Controls the falloff of the rimlight effect (this is actually the specular reflection). Avoid low values where cloth appears glossy. Higher values make cloth appear thick.
  • Metallic
  • Cloth – Controls the BRDF; 0=microfacet (default shading), 1=cloth BRDF
  • Fuzz Colour – Reflectance/F0/Specular Colour of the cloth. When metal=1, the reflectance is still the Fuzz Colour, not the Albedo like in the microfacet model!
Map inputs (Cloth=Mask, Fuzz Colour=Tramissive)
Use the cloth input (0 or 1) to blend between BRDFs just like Epic’s model

Sample Graph

A very basic sample graph has been provided to view how the inputs can be setup.
Comes bundled with a cloth mesh for best viewing the viewport shading

Recommendations

Use the directional light & disable IBL (3D View>[material]>Edit) to best see how light will interact.

Balance the albedo & fuzz colour.

Use roughness values above 0.3. Mid value ranges (0.4-0.8 seem to work best).

Unreal Shader for Substance Designer

Grab this from my git repo – github.com/Calvinatorr/SubstanceShaderUE
*Install instructions included in the readme

The aim of this tool is to provide a more accurate representation with the Unreal Engine 4 viewport by providing a pixel shader which uses BRDFs closer/pulled from Unreal’s shaders, as well ACES tonemapping.

What this provides:

  • ACES filmic tonemapping curve
  • (optional) directional light
  • (optional) IBL toggle
  • IBL samples slider (default changed from 16 to 64)
  • BRDFs more accurate to Unreal (Fresnel Schlick approximation, GGX Smith) – light source calculation & IBL
Options added in the material properties menu

Comparison

I compared the same input parameters against Substance Designer vanilla, my shader, and the UE4 viewport.
Those being albedo=(.75,.75,.75), roughness = .25, and metallic=1.

The results I got still aren’t 1-1 as there’s a lot of complex stuff going on Unreal, especially with an adjustable log curve for the tonemapping, but generally I feel this is good enough to at least have a better idea of what your material will look like across packages.

Substance Designer vanilla (left), my shader (middle), Unreal Engine 4 viewport

What Next?

I’m continuing to review the BRDFs and colour transform as I use the shader myself and will update the git repo as I go.

I’ve already investigated doing the same for Substance Painter, but unfortunately Painter’s renderer is more complicated (seemingly deferred), compared to Designer which seems to be done in forward.
This means in Designer I can touch the final pixel colour as I wish (there is some still some post effects which can be enabled after this in the pipeline), which means I can directly control the shading BRDFs.

Painter seemingly provides shaders more as material shaders, to provide a way to program the inputs into an already existing shading model which I can’t touch (think Unreal’s material graph).

Voronoi Noise

For this exercise I written a voronoi noise function, also known as cell noise, or worley noise.
If you want to use it you can grab it from here – just paste it into a material function.

The noise pattern ends up looking like this, which essentially represents a distance field to a set of points randomly scattered

Though I’m still not happy with the distribution of points (as you can see below) isn’t random enough – this can be tweaked from a set point in the code, but for now I got what I needed from this.

And this method can be used for more than just “here’s some random noise” if approached from the perspective of representing a set of randomly scattered points!

I’m leveraging some methods from Unreal’s library of random noise algorithms which you can include in HLSL of your custom node.
You can include any of the of the engine HLSL files in a custom node by using a path relative to /Engine/, for example:

#include "/Engine/Private/Random.ush"

The final output tallies up to 52 instructions according to Unreal’s material editor stats.

This is in contrast to Unreal’s VectorNoise atomic node which also gives you the closest point (RGB), and the distance (A).
Just using the distance from the VectorNoise node will cost you a whopping 162 instructions!

Base pass 194 instructions total. Subtract baseline cost of 32 instructions as of UE4.23.
Base pass 84 instructions total. Subtract baseline cost of 32 instructions as of UE4.23.

Code (HLSL)

This is the code inside my HLSL function which does all the work.

The basic premise is I calculate which cell I’m currently at, generate an (squared) SDF (signed distance field) for a point randomly generated inside the cell, and combine it with the currently accumulated distance field (using min()).
I do the same for each neighbouring cell, so

#include "/Engine/Private/Random.ush"

float AccumDist = 1;

for ( int x = -1; x <= 1; x++ )
{
	for ( int y = -1; y <= 1; y++ )
	{
		for ( int z = -1; z <= 1; z++ )
		{
			float3 CurrentCell = floor(UV) + float3(x, y, z); // Find neighbouring UV or current (when x,y == 0)

			// Get random point inside cell
			float2 Seedf2 = float2(Seed, Seed);
			float3 Rand = float3(PseudoRandom(CurrentCell.xy + Seedf2), PseudoRandom(CurrentCell.xz + Seedf2), PseudoRandom(CurrentCell.yz + Seedf2));
			float3 Point = frac(Rand) + CurrentCell;
			
			float3 Dir = Point - UV;	// Generate vector	
			float Dist = dot(Dir, Dir); // Get distance squared
			
			AccumDist = min(AccumDist, Dist); // Combine with current signed distance field (sdf)
		}
	}
}

return AccumDist; // sqrt() this to get distance

Some notes I think are important to note from this are:

  • UNROLL macro – I’m not using this, instead I’m letting Unreal’s HLSL compiler decide as it usually does a good job. In this case it chose to not unroll my loops – this is most likely as the branch is non-divergent which allows the GPU to not stall when processing a branch due to how GPUs process pixel groups in parallel
  • If you chose to use any of the branching macros ([flatten], [branch], [unroll] etc) you should use Unreal’s macros (caps, remove []) as you’ll avoid cook errors when compiling to PSGL for PS4 for example.
  • I am accumulating a signed distance field as distance squared.
    A common trick to do this is to get the dot product of a vector with itself to return the length squared of that vector!
    I’m doing this because using distance() or length() will involve a sqrt(), which is an expensive operation to perform, especially if we’re doing this a lot.
    So instead I am working in distance squared, and then I sqrt() I’ve executed my loops – in-fact I do this in atomic nodes to work best with my material function set-up, in-case I do want to use distance squared.

Profiling

I initially started my profiling just using gpu stat in Unreal.
It showed me at fullscreen (approx) 1920×1080 with a quad with my shader applied it was .35ms on the base pass. Annoyingly this was no different than a regular unlit shader.

Fullscreen (approx) 1080p with just unlit quad with shader applies costs approx .35ms base pass according to Unreal’s profiler – same as a regular unlit material.

So I compared the baseline (quad + unlit shader) with my shader in renderdoc.
On average I saw about 300uS cost, so I’ll chalk that up to this costing around about .3ms on GPU if this is calculated fullscreen. Sounds about right (still not terribly accurate though).

I also compared (not shown below) the atomic VectorNoise.a method which yielded an average of 850us base pass (.35ms cost), so by the tiniest amount more expernsive.

A win, I suppose? I guess it at least proves there is no huge overhead from my branching in this case.

Load FBX sop

github.com/Calvinatorr/CommercialHDAs/blob/master/FBX_sops.hda
To install just point your houdini.env file to the hda/folder of your hdas, or use the install hda feature.

I developed this tool because the current import FBX sop isn’t very procedural as it’s only accessed through a menu (though you can call it from Python, which is what I am doing essentially).

Said tool generates an objnet consisting of a series of nodes which represents the hierarchy of the FBX – this can be a pain to work with though, especially compared to the File sop which just pulls in geo as is.

This tool just wraps up that tool in a sop context and pulls all references in to the local HDA level, and builds the subsequent networks to output and organsie the geometry.

How it works

As this tool is just a sop wrapper which calls the FBX API already exposed, it should be maintainable going forward as all the heavy lifting is already done.

This is also useful as it builds the necessary matnets, transforms, hiearchies etc which I can utilise – I just move this whole objnet to an editable objnet inside my HDA context.
My tool then builds 2 objmerge networks to pull in the geo from the objnet.

For example this subway train has a load of submeshes & material IDs which you can see in this hiearchy
The Load FBX sop will build the objmerge networks in these subnets and output them (including groups and attributes), pretty simple
The actual network looks like this.. and unfortunately you can’t just use a single objmerge to combine all these nodes
And for the unaware – you can define Editable Nodes in your HDA. This means even when the HDA is locked you can change the state of those nodes!
Thanks Luiz Kruel for pointing me to this, I felt pretty dumb when I realised this is of course what they are for!
Subsequently, the user only has to see this – simple! If they want to reload the geometry, they can just call pressButton() on the button param.
I’ve even exposed the collision net as guide geo – neat!
sop level access & parameter panel
Can be embedded into other HDAs just like a file sop

All the work in this tool is in the Python module attached to the HDA, where the LoadFBX() method is called by a callback on the load button callback, and the text field callback.

I’m doing this with this very simple line to be able to call my methods from a Py module on the current node context we’re executing from.

hou.phm().LoadFBX()

And this is the Python module.
Edit 06/01/2020: Updated with import transform functionality, vertex colour preservation (prevent mismatch of Cd attribute), added ClearGeometry() method, & added suite of import options

import os, sys

def ClearNetwork(network):
    for child in network.children():
        child.destroy()


def SetupMergeNetwork(network):
    result = {"network":network}
    ClearNetwork(network)
    result["merge"] = network.createNode("merge", "merge")
    result["merge"].setDisplayFlag(True)
    result["merge"].setInput(0, result["network"].indirectInputs()[0])
    return result


def ClearGeometry():
    with hou.undos.group("Clearing geometry loaded from '" + hou.parm("file").eval() + "'"):
        ClearNetwork(hou.node("IMPORT"))
        ClearNetwork(hou.node("GEO_MERGE"))
        ClearNetwork(hou.node("COLLISION_MERGE"))


def LoadFBX():
        # Get file path
        file = hou.parm("file").eval() # Evaluate path
        file = os.path.normpath(file)
        if not os.path.exists(file):
                raise hou.NodeError("File doesn't exist")
                return


        # Find import objnet (editable)
        objnet = hou.node("IMPORT")
        ClearNetwork(objnet)

        # Import FBX
        #hou.hscript("fbximport {}".format(file))
        materialMode = hou.fbxMaterialMode.FBXShaderNodes if hou.parm("materialMode").eval()==1 else hou.fbxMaterialMode.VopNetworks
        compatabilityMode = hou.fbxCompatibilityMode.FBXStandard if hou.parm("compatabilityMode").eval()==1 else hou.fbxCompatibilityMode.Maya
        rawFbx = hou.hipFile.importFBX(file,
            import_animation=hou.parm("importAnimation").eval(),
            import_joints_and_skin=hou.parm("importJointsAndSkin").eval(),
            resample_animation=hou.parm("resampleAnimation").eval(),
            resample_interval=hou.parm("resampleInterval").eval(),
            import_materials=hou.parm("importMaterials").eval(),
            material_mode=materialMode,
            compatibility_mode=compatabilityMode)
        fbx = rawFbx[0].copyTo(objnet)
        rawFbx[0].destroy()


        # Link import transform
                
        fbx.parm("xOrd").set(hou.parm("xOrd"))
        fbx.parm("rOrd").set(hou.parm("rOrd"))

        fbx.parm("tx").set(hou.parm("tx"))
        fbx.parm("ty").set(hou.parm("ty"))
        fbx.parm("tz").set(hou.parm("tz"))

        fbx.parm("rx").setExpression('ch("../../rx") + if(ch("../../axis")==1, 90, 0)', language=hou.exprLanguage.Hscript) # Link scale
        fbx.parm("ry").set(hou.parm("ry"))
        fbx.parm("rz").set(hou.parm("rz"))

        fbx.parm("sx").set(hou.parm("sx"))
        fbx.parm("sy").set(hou.parm("sy"))
        fbx.parm("sz").set(hou.parm("sz"))

        fbx.parm("px").set(hou.parm("px"))
        fbx.parm("py").set(hou.parm("py"))
        fbx.parm("pz").set(hou.parm("pz"))

        fbx.parm("prx").set(hou.parm("prx"))
        fbx.parm("pry").set(hou.parm("pry"))
        fbx.parm("prz").set(hou.parm("prz"))

        fbx.parm("scale").setExpression('ch("../../importScale") * ch("../../scale")', language=hou.exprLanguage.Hscript) # Link scale


        # Build merge networks

        # Clear networks first
        geo = SetupMergeNetwork(hou.node("GEO_MERGE"))
        collision = SetupMergeNetwork(hou.node("COLLISION_MERGE"))

        # Generate objmerge nodes
        for child in fbx.children():
                if not child.type().name() == "geo":
                        continue # Skip this iteration
                        
                isCollider = any(s in child.name() for s in {"UBX", "UCP", "USP", "UCX"})
                mergeNet = collision if isCollider else geo

                objMerge = mergeNet["network"].createNode("object_merge", child.name()) # Create objmerge node

                # Set-up parameters
                objMerge.parm("xformtype").set("local")
                objMerge.parm("createprimstring").set(True)
                objMerge.parm("pathattrib").set("path")
                objMerge.parm("objpath1").set(mergeNet["merge"].relativePathTo(child))
                objMerge.parm("createprimgroups").set(True)
                objMerge.parm("primgroupprefix").set(objMerge.name() + "_node")
                objMerge.parm("suffixfirstgroup").set(False)
                mergeNet["merge"].setInput(len(mergeNet["merge"].inputConnections()), objMerge) # Connect to merge
                objMerge.moveToGoodPosition()
                
                
                geo["merge"].moveToGoodPosition()
                collision["merge"].moveToGoodPosition()
                
        # Select this node to bring parameter panel back
        hou.pwd().setSelected(True, True, True)

What’s next?

FBX Export sop of course!

An FBX rop exists of course, but I would like to simplify the process of building a hiearchy from an objnet level, to a sop level and be data-driven to make proceduralism easier.

I am still thinking of my approach to this, but at the simplest level I believe it’d be at least useful to include a collision pin and allow my sop to build the relevant hiearchy and node names, and perhaps some helper sops to categorise collisions.. we will see!

Featured

Introduction

Who am I?

I am a technical artist currently working in AAA.
At the time of this post I’m working at The Multiplayer Guys (Improbable), and previously I worked at Sumo Digital, and as a freelance technical/vfx artist on various AAA & indie projects on a variety of platforms (mobile, VR, console, PC).
I also have a strong background in 3d art.What is this blog for?

I got tired of making tools, shaders, VFX etc in a vaccum and forgetting to share it outside of my circles! So I want to share what I learn and make publicly for people. *Not affiliated with my current employer in any way

I also want to be able to provide a much heavier and more technical insight into topics people maybe don’t cover related to tech art, or maybe get left at the wayside in the art circle!

Also who knows? Maybe I will be able to share some of my work on titles I have worked on after their release.. (big maybe no promises)

What this blog is not

This is not my portfolio. Clean and simple.
If you want to see actual 3d art, I post that here (mainly for fun) – artstation.com/calvinatorr
Though I don’t do 3d art 97% of the time in my day-to-day duties, I guess I am still (technically) an artist! I still find it extremely important to remain adept at 3d art processes and even some traditional.

This is also not a place where I will post my cat pictures.. after this one.. okay no more!